Wondering how to get that warm, glowy and dreamy look that you see often on portraits, wedding shots and fashion blogs? The images look like they have beautiful light pouring in, while in fact the rest of the photo is still quite detailed and sharp.
How is it done?
There are many methods to pulling off this look, and we always encourage our photographer clients to do as much of it as possible on the camera itself, so that the post-edit is believable and natural.
We like adding natural light leaks and bokehs to images to pull off this look.
Basic Light Flare Tutorial
Step 1: choose your image, try to avoid images that are excessively dark. I’m choosing a mid-toned image here where everything can be seen but there’s just not enough of that spark that I want. My intention for this photo is to become a lot more warm, as if the sunset is magically warming up the photo.
Step 2: Pick a light flare, haze or Bokeh. I got a beautiful set from Creative Market for this one.
Step 3: on photoshop, place this light flare image on top of your current layer
Step 4: Set your blend mode to Screen. Screen means the light portions of the image are going to see through to the layer below, while the dark portions of the image are hidden. Move the image around and see what shape works for you.
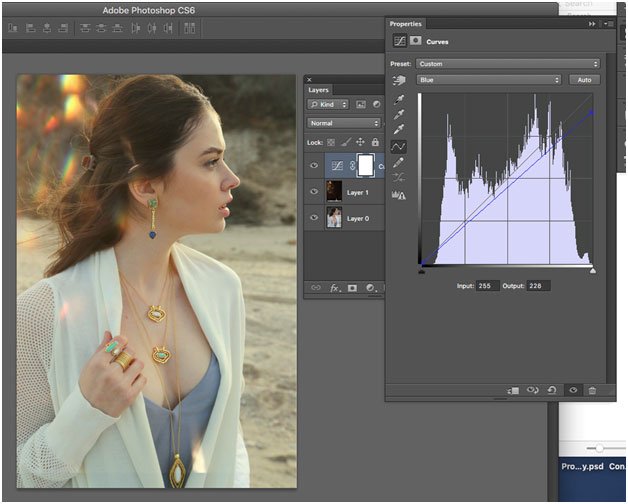
Step 5: To make that warmth a little bit more believable, I’m going to adjust my curves to include more yellows to the layout.
In the curves tab, I’m selecting blue because the absence of blue means there’s more yellow. I’ll pull the curve down a little to “decrease” blue and increase yellow.
Step 6: I’ll create another curve to increase some contrast, but this time I want to apply it to all the colour tones so by default you’re taken to the RGB setting. On RGB I’ll lift up some of the midtones, and drop a little bit of the shadows to create a deeper look.
Step 7: I’ll add a larger light flare on top, as if the light rays are hitting the camera directly. They’re big and blurry.
There’s no rule on how you should use the flares, do what feels right and balanced for the shot.
I played around with a few different flares and curves. Remember, intention is everything. I intended this image to be ultra warm, ultra fuzzy and dreamy.
With photo retouching, it’s all about mixing technique with your gut feel.
Here are a few more examples
Work With Us
We’re here to edit any kind of image you have. Big or small, short or tall, a few images or ALL, we’re the team that you can call. Experience unmatched dedication to quality and service and find out why some of the world’s most recognized brands choose to work with us!